Monday, October 22, 2012

Ladies, Vampy Tips, and friendly quips

I had a nail TRAGEDY a few days ago, namely a bad break up to the nail line. Worried for my remaining nails, I clipped and filed all 10 down to very short but hopefully healthy nails. These, however, are not the best for showing off my polish skills.

Luckily, two friends spent some time with me over the weekend and allowed me to play around.

The first friend was going to a costume party that evening and had a BRILLIANT couples costume idea: She would dress in formal wear and wear a dog tag that said "Lady" and her husband, dressed as a hobo, would wear one reading "Tramp".  ^.^

Playing off of the dressiness of her costume and the adorable red bow Lady has when she first appears in the Disney film, I did black nails with white tips and red bow accents. By a happy accident, some of the bows ended up looking like dog bones! I used Sally Hansen Insta-dry in pitch black, the Sally Hansen white tip pen, and Sally Hansen nail art pen in red.

Isn't this an awesome costume idea? I love it...

While I was working on Lady's nails, my other friend used the same pitch black polish and went over it with China Glaze Ruby Pumps, a favorite combination of mine, to create a great vampy red glitter.

When she was done, I used my white tip polish and a toothpick to add some vampiric accents which would be great for any Halloween manicure. (Beware, these pictures are taken pre-cleanup)


If I ever did this manicure on myself, I wouldn't be able to resist walking around like this all day: 


Thanks for lending me your long nails, ladies! 

Happy polishing!

Tuesday, October 16, 2012

Spider Web Sparkles

On a recent trip to Ulta, I was excited by the Orly brand Spellbound collection and picked up "Right Amount of Evil" to try out.  It appeared to be an orange jelly with silver holo hex glitter, some bar glitter that looks like tiny tinsel bits to me, and a slight shimmer. Hoping to have another Halloween look for the blog, I layered it over black. I was expecting a glitter-tastic orange and black fun manicure and instead I got a purply-brown glitter that would be lovely as a fall mani, but didn't have any spook factor. 

Solution?  White nail polish and a tooth pick to make...

Spider webs!

And, as you can hopefully see on the thumb nail, spiders with neon yellow eyes! 
Still don't see it? Click the photos to "embiggen"!

 Ack, another arachnid!


After finishing up with my full sun glamour shots, I went inside to take some more photos and had an unexpected visitor...

Have you spotted them? It's... it's...

ONE OF MY CATS! 

She came to sniff...

and stayed for the pets.

Once she had her fill, I took a few last shots of my left hand

and my polished insect friend.

Wait... are spiders insects? Biology was a few too many years ago to know that one off the top of my head. Thoughts? 
 
Do you like the webbing? As always, comments are welcome and if you try this at home, send along some photos! 

Happy (haunted) painting!

Sunday, October 14, 2012

And the winner is....

 *insert enthusiastic drumroll here*

BOTH!

Essentially, when I tallied the votes from here on the blog, my facebook, and reddit laqueristas (the c was sold to pay for polish) I had more people tell me that they liked the mix of both accent nails better than either on their own. Interestingly, no one chose the yellow tipped nails on their own... but white tips got the most solo votes by a landslide. 

So, to please the masses and to continue to develop my tip taping skills, I did an every-other candy corn nail art. It reminds me more of how actual candy corn looks all jumbled up in a bowl. I'm a fan. If I were doing a matching set though, I'd go with white tips.


 Here's a shot of the two side-by-side

and awkward thumbs up!

Taking photos of my own hands is proving more difficult that I anticipated...

Friday, October 12, 2012

Candy Corn, Accents, and Mattes. Oh my!

I've had a bottle of NYC "Matte Me Crazy!" top coat sitting out to try for over a month now... I knew I wanted to do something interesting with it, and as I was picking my brain for Halloween / fall themed nail art, the naturally matte texture of candy corn plopped in front of me like a welcome pet.  I already had a gorgeous duo of orange and yellow to use, "Orange you hot?" and "Sun Kissed", both from the China Glaze Summer Neons Collection and I swear by the Sally Hansen french tip white pen. All that was left to do was figure out how to apply it, right?

Well, yes, but it wasn't easy. I tried taping but did it too soon and ripped all the polish right off with it and gunked up my nail bed (eww) so I tried to freehand it and it looked okay but I kept getting the proportions wonky. And then the debate on what order to do the manicure in commenced between a few friends and myself. A few advocated for yellow, orange, then white tips since white tips are a classy nail staple. Others advocated for white moons, orange middles, and yellow tips so that the cone shape of my nail would mimic the cone shape of the candy corn. I could see both sides, and was torn.

So I did both as accent nails! Yellow-orange-white on my left hand ring finger and white orange yellow on my right hand ring finger. I'll post all of my photos and I want YOU to help me choose which to do as a full manicure! Check out the pictures and tell me which is your favorite in the comments.

Both hands, no flash, holding on to an awesome candy corn gel candle. Smells like the real deal, no calories! 

Left hand, no flash

Left hand, flash

Right hand, no flash

Right hand, flash

Left hand, full sun (With jumbo smarties! Candy is on theme, right?)

Right hand, full sun

The accent nails, head-to-head, full sun

So what do you think, internet? Do the white tips rule supreme? Is the conical candy dupe the way to go? Do you admire my resolve in not eating the entire jumbo roll of smarties before taking a photo of it? (Because you should...) Poll winner will be announced in a follow-up post Sunday!
Poll winner announced here: Winner!

As far as this manicure goes, I ended up letting a coat of orange dry over night, taping the tips, and free-handing the moons which meant lots of clean up. I'm in LOVE with the matte finish though. I was skeptical at first because I adore the smooth shiny finish of a Seche Vite manicure, but this feels silky to the touch and give a whole new life to a bright shimmer like "Orange you hot".  You can bet I'll be doing more with matte soon!

Wednesday, October 10, 2012

Monarch!

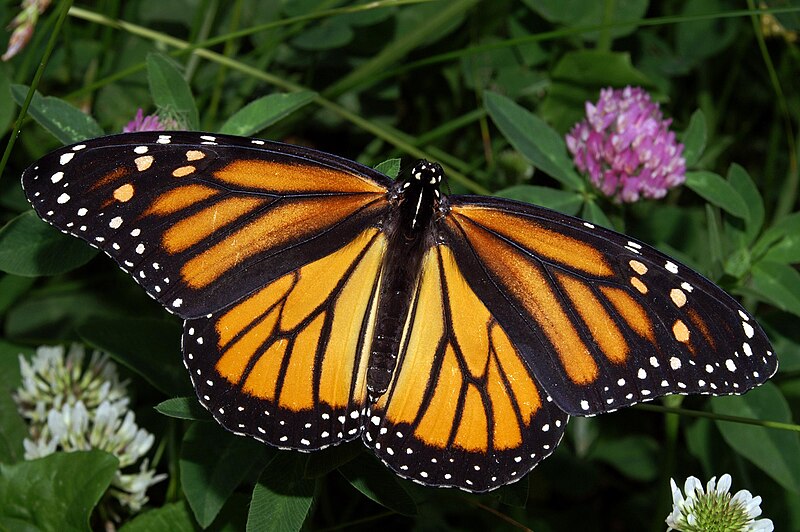
After much frustration I scrapped the photos for my two most recent manicures as this camera just could not photograph glitter at ALL. I hope to redo them when I have access to a better camera, but for now I chose to do a glitter free look inspired by monarch butterflies. For the record, they look like this:
Photo from Wikipedia

Unfortunately, I didn't budget nearly enough time to do my nails before heading out the door, so my first look with this one was a fun french tip orange design with one monarch accent nail. Please forgive the ultra-blurry cell phone pic.
With that accent nail, I used a paint brush to add the black lines and had a lot of issues with polish flooding my cuticles. So, as I came home that evening i bought one of the Sally Hansen nail art pens in black to give that a shot. Here's what happened:

A monarch inspired manicure I am pretty pleased with! I kept the original accent nail after cleaning the edges with acetone and a pointed Q-tip and painted the black over the existing tips. Fun! Here's some more shots:


And a couple of the bottle of orange I used. It's a Sally Hansen Diamond Strength Limited Edition shade that I only recently spotted at my local Ulta, released for Summer 2012. It's called Moonlit Dance and I'd describe it as a bright orange with a yellow-gold glass fleck. Very pretty and perfect for my butterfly look.


If you try this yourself, I'd love to see! Link it to me in the comments.

Happy painting!

Introduction to the Collection

I found my camera cord! As such, I was able to upload the photos I had taken of my nail polish collection three days ago. Unfortunately, in those three days I have already picked up six more polishes that won't appear in the swatches on this post. What? Ulta was having a sale! *sigh*  This will still give you a decent idea of what I own, though. I've got plain colors, foils, glass flecks, glitters, holographics, crackles, duochromes, magnetics; basically most things I can get my hands on.

I've also discovered the my beloved little digital camera is just not going to cut it for blog-ready photos, and until I replace it that's all I have. So, please persevere with me as I do my best with a camera that just cannot handle focusing on pretty things and a primitive flash.

First, my entire collection (as of three days ago) without flash: 

And with:

You can see my swatch wheels at the bottom of those photos; I swear by them! It's so much easier to pull out a nail wheel and pick a shade of red than sorting through bottles hoping the color on the nail will be close to the one you're seeing through the glass. I have numbers on each bottle to correspond to the wheel to make it easier to locate each one. I highly recommend it for anyone who lacks enough space to display each bottle well and has to put them away in cases or sadness drawers like I do.

Here's my wheels by color:

Red
 
Orange and Yellow

Golds and Browns

Greens

Blues

Purples

Pink - No flash

Pink - With flash

Silvers and grays

Blacks

Whites


For the record,  I do own top coats and base coats etc, but didn't see a point in swatching them for what I hope are obvious reasons. 

So there you go! If you want to know what a specific color is, ask in the comments and I'll do my best to get back to you.