Sunday, October 28, 2012

Hurricane Cometh, Northeast Freaks Out!

I'm a Florida girl, raised on yearly family camp outs in our own home with metal shutters over all the doors and windows and a house stocked with water, batteries, a tiny crank operated television, and all the non-perishable snack foods you could convince Grandma to buy. Big storms remind me of my childhood in a thrilling way. This is the second time I'll weather one here in central PA, and I must admit that at first, I thought to myself "why all the fuss over a cat 1?", but I think I understand now. The architecture, natural surroundings, and people of this area are not prepared for this.

Grocery stores sell out of bread and milk, schools are closed days in advanced, and many families experience devastating flood, tree, and wind damage even from these seemingly small storms.  While I don't really understand why people are stocking up on such perishable food items, I do understand the fear of the unknown, the pain caused by past storms, and the devastation that these storms can cause. So, to all my friends, family, and internet neighbors here in the northeast, please be safe! Be prepared! Most of all, be with people you love. They make it better in the face of any of life's storms.

Most of my family's storm prep has been long done, but I felt one last thing was necessary before heading to bed to await landfall: my nails! This is, after all, my favorite hobby. And so, inspired by the hurricane tracking maps I've been lurking for days, I give you the Hurricane Sandy Manicure!

I did a gradient with Rimmel 60 Seconds in "Green with Envy" and Revlon "Royal", a new favorite. Then I used a generous shiny seal of Seche Vite topcoat. For the hurricane accent nail, I used a no-name white polish I got in Korea. My painting tools were toothpicks and makeup sponges.


 As always, click a picture to zoom it if you wish. :)

And finally, my best impression of Hurricane Sandy's appearance on the weather channel, via my wildly inaccurate stress ball Earth:

Stay safe and dry, and happy polishing!


Friday, October 26, 2012

Autumn leaves

Most of my family and friends agree: whether you call it Autumn or Fall, this season is AWESOME. I grew up in South Florida, a place which had only two seasons, namely hot and hurricane. Having moved to Pennsylvania, I am truly enjoying the crisp air, local apples and good cider, crunchy leaves, trendy sweater dresses, and beautiful warm colors. This is my mom's favorite season, and every fall decoration makes me think of her. So, it is with her in mind that I approached my latest nail art, all done with a toothpick.

Autumn trees and leaves!
(Zoom this photo to see the colors I used. Have a question? Leave a comment)

I was trying to wait until the clouds blew away to take sunny photos of this manicure but I just had to share it!


Have you tried any fall-themed manis yet? Tell me in the comments.

Happy polishing!

Thursday, October 25, 2012

Sunrise and Sunset - Study in Gradients

I have been planning to try a gradient manicure for some time now, and since filing my nails so short I've been looking for deigns that would visually elongate my nail bed. Seemed like a great time to try!

I've tried twice now, both times inspired by the colors of sunset. The first was a yellow to red fade with shimmer and the second a deep blue to purple, like the sky just after the sun disappears entirely.


Here's some closeups of each.

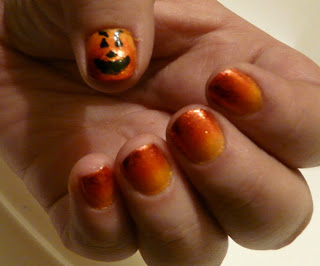
This mani used China Glaze Orange You Hot? with Hard Candy Lava dabbed on with a makeup sponge.  In an attempt to make it more halloweeny I tried to do a Jack-o-lantern accent thumb.

 NOT my best work... *sigh*


And here's the purple blue goodness! The blue was Revlon Royal, a gorgeous blue jelly that is opaque in one coat and the purple is a Funky Fingers that I got as a gift. My camera didn't really do well with differentiating between two dark deep colors... and frankly neither did my eyes. In the bottle, the colors were different but once layered, most of that difference disappeared.


These two were taken inside. 

And all of these outside! Our yellow mums are coming up. ^.^


Moral of the gradient story: Makeup sponges are great for creating an even fade, but choose colors that are already very different. My blue and purple were already pretty similar, and layering the purple over the blue made it just as dark. The orange and red though... that I'm definitely going to do again. :)

Happy painting!

Monday, October 22, 2012

Ladies, Vampy Tips, and friendly quips

I had a nail TRAGEDY a few days ago, namely a bad break up to the nail line. Worried for my remaining nails, I clipped and filed all 10 down to very short but hopefully healthy nails. These, however, are not the best for showing off my polish skills.

Luckily, two friends spent some time with me over the weekend and allowed me to play around.

The first friend was going to a costume party that evening and had a BRILLIANT couples costume idea: She would dress in formal wear and wear a dog tag that said "Lady" and her husband, dressed as a hobo, would wear one reading "Tramp".  ^.^

Playing off of the dressiness of her costume and the adorable red bow Lady has when she first appears in the Disney film, I did black nails with white tips and red bow accents. By a happy accident, some of the bows ended up looking like dog bones! I used Sally Hansen Insta-dry in pitch black, the Sally Hansen white tip pen, and Sally Hansen nail art pen in red.

Isn't this an awesome costume idea? I love it...

While I was working on Lady's nails, my other friend used the same pitch black polish and went over it with China Glaze Ruby Pumps, a favorite combination of mine, to create a great vampy red glitter.

When she was done, I used my white tip polish and a toothpick to add some vampiric accents which would be great for any Halloween manicure. (Beware, these pictures are taken pre-cleanup)


If I ever did this manicure on myself, I wouldn't be able to resist walking around like this all day: 


Thanks for lending me your long nails, ladies! 

Happy polishing!

Tuesday, October 16, 2012

Spider Web Sparkles

On a recent trip to Ulta, I was excited by the Orly brand Spellbound collection and picked up "Right Amount of Evil" to try out.  It appeared to be an orange jelly with silver holo hex glitter, some bar glitter that looks like tiny tinsel bits to me, and a slight shimmer. Hoping to have another Halloween look for the blog, I layered it over black. I was expecting a glitter-tastic orange and black fun manicure and instead I got a purply-brown glitter that would be lovely as a fall mani, but didn't have any spook factor. 

Solution?  White nail polish and a tooth pick to make...

Spider webs!

And, as you can hopefully see on the thumb nail, spiders with neon yellow eyes! 
Still don't see it? Click the photos to "embiggen"!

 Ack, another arachnid!


After finishing up with my full sun glamour shots, I went inside to take some more photos and had an unexpected visitor...

Have you spotted them? It's... it's...

ONE OF MY CATS! 

She came to sniff...

and stayed for the pets.

Once she had her fill, I took a few last shots of my left hand

and my polished insect friend.

Wait... are spiders insects? Biology was a few too many years ago to know that one off the top of my head. Thoughts? 
 
Do you like the webbing? As always, comments are welcome and if you try this at home, send along some photos! 

Happy (haunted) painting!

Sunday, October 14, 2012

And the winner is....

 *insert enthusiastic drumroll here*

BOTH!

Essentially, when I tallied the votes from here on the blog, my facebook, and reddit laqueristas (the c was sold to pay for polish) I had more people tell me that they liked the mix of both accent nails better than either on their own. Interestingly, no one chose the yellow tipped nails on their own... but white tips got the most solo votes by a landslide. 

So, to please the masses and to continue to develop my tip taping skills, I did an every-other candy corn nail art. It reminds me more of how actual candy corn looks all jumbled up in a bowl. I'm a fan. If I were doing a matching set though, I'd go with white tips.


 Here's a shot of the two side-by-side

and awkward thumbs up!

Taking photos of my own hands is proving more difficult that I anticipated...